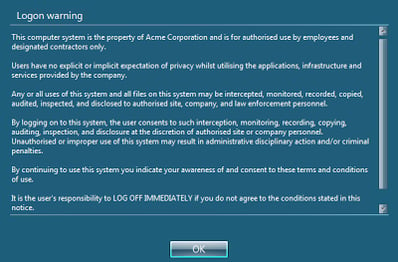
When it comes to putting systems and infrastructure together for end-users, perception and presentation are key. That’s why, in end-user computing, it always pays to have things looking smooth and professional. A lot of the user perception with regard to the quality of a system goes hand-in-hand with the presentation – if something looks like it’s been thrown together by a bunch of drunken monkeys, it’s going to be facing an uphill battle to win users over.
That’s why I’ve always found it a bit of a pain when putting together legal notices for systems. Since the Windows NT4 days, you’ve been provided with two Registry keys – LegalNoticeCaption and LegalNoticeText – that allow you to provide the title and the body of the legal notice displayed to your users at logon time. However, those who can remember Windows NT4’s teal-green heyday will also recall that it only accepted a single text string.
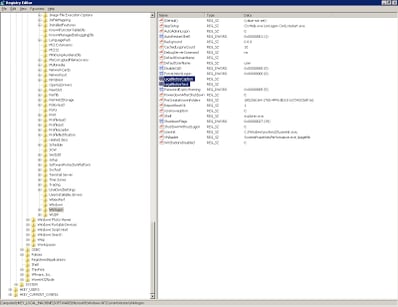 |
| The Registry keys that help you out with providing a legal notice to your users |
Fast forward to the goodness of Windows 2000, and the comma was adopted as a carriage return character for your legal notice Registry values. However, as you’ve probably guessed, this wasn’t really much use in the real world, as most paragraphs in the English language have a tendency to adopt common punctuation such as the comma to provide rhythm and syntax to text.
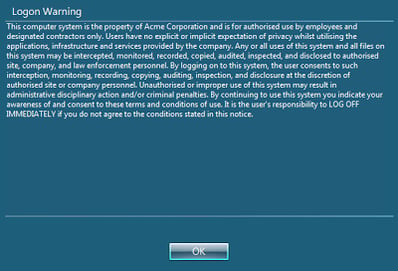
Move on now to Windows 2003, and these keys moved up and around a bit inside the Registry to allow them to be managed through Group Policy Objects. There was even (cue fanfare) a change to allow you to insert carriage returns in the editor for the text – but no change as to how this was interpreted by the Windows operating system itself, which made the changes in the editor absolutely useless. Even now, on Windows 2008 R2 (although I can’t speak to Windows Server 2012 yet), no matter how you format your text in the editor, you will end up with a legal notice that looks like this to the users
Deploying the Legal Notice in a Citrix Provisioning Services (or similar technology) environment
The strength of technologies like Citrix PVS is in exactly situations like these. If a setting needs to be applied to x amount of systems, you simply update the gold/master image with the required settings, seal the image, and then restart your endpoints. Hey presto! – you’ve deployed the setting to all of them.
First you’ll need to insert your required text into something like Notepad. Don’t format it with carriage returns – use something else instead. I use the tilde (~) symbol – it stands out nicely for this purpose. Use two tildes for a single carriage return and four for a line space. In case you’re struggling to get my meaning, here’s the text I’d put into Notepad if I was doing this for the legal notice shown in the screenshot previously.
~~This computer system is the property of Acme Corporation and is for authorised use by employees and designated contractors only.~~~~Users have no explicit or implicit expectation of privacy whilst utilising the applications, infrastructure and services provided by the company.~~~~Any or all uses of this system and all files on this system may be intercepted, monitored, recorded, copied, audited, inspected, and disclosed to authorised site, company, and law enforcement personnel.~~~~By logging on to this system, the user consents to such interception, monitoring, recording, copying, auditing, inspection, and disclosure at the discretion of authorised site or company personnel. Unauthorised or improper use of this system may result in administrative disciplinary action and/or criminal penalties.~~~~By continuing to use this system you indicate your awareness of and consent to these terms and conditions of use.~~~~It is the user’s responsibility to LOG OFF IMMEDIATELY if you do not agree to the conditions stated in this notice.~~
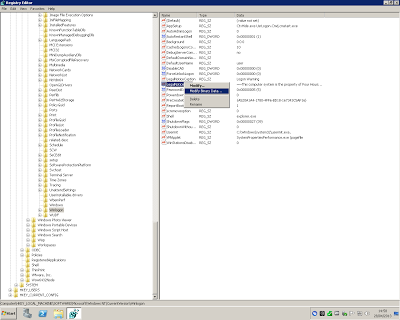
Once you’ve done this, you will need to paste the text of the above directly into your LegalNoticeText Registry value. In case you don’t know where to find it, it sits in HKLM\Software\Microsoft\Windows NT\CurrentVersion\Winlogon, and is a REG_SZ value. You can also set the corresponding LegalNoticeCaption value at the same time – this is simply the title of the legal notice window, and I normally simply use something like “Logon warning”.
Now, once you’ve pasted this tilde-separated text into the LegalNoticeText value, right-click the value and choose the Modify binary data option as below
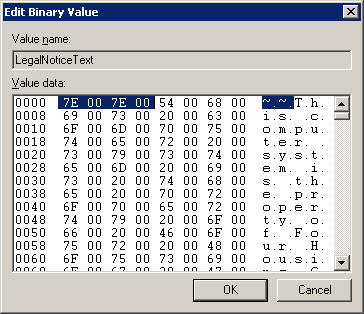
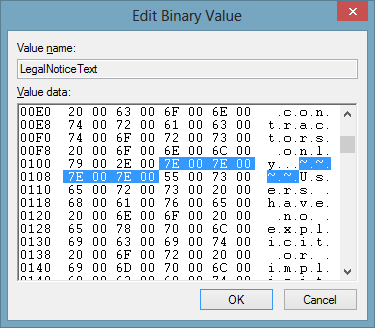
The next trick is to find the binary representation for the double tilde (you can use the right-hand portion of this window to help you, as it shows the corresponding “normal” text in that side) which should be 7E 00 7E 00. I’ve highlighted them in the screenshot below. You will need to do the same, because we are going to replace it by typing a new value straight over the top. The reason we used double tildes is because the data we are replacing it with also has four sets of paired values and it makes it easier to replace them like-for-like.
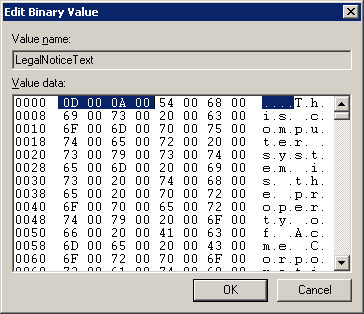
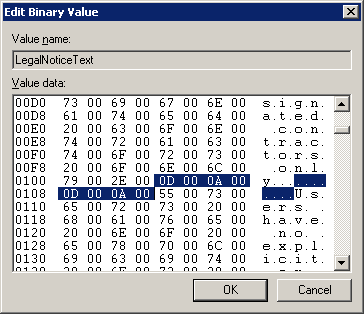
Now we will replace this with the data that represents a carriage return. The data is 0D 00 0A 00.
Next we need to search down through the binary data and find the next set of double tildes.
There are two this time, because we need to put in two carriage returns which will give us a line space between paragraphs. So we are replacing the 7E 00 7E 00 7E 00 7E 00 with 0D 00 0A 00 0D 00 0A 00 in this case.
Based on the number of paragraphs you have to format, you now need to repeat this process until all the double tildes are replaced.
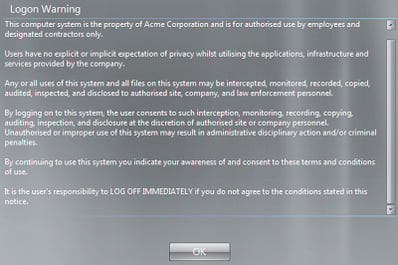
Once you’ve done this, assuming you’ve done it correctly (if you haven’t, if you’ve missed a value slightly, you may see some bizarre output in the text when you log on!) your Legal Notice should look much nicer, as shown in the next screenshot. If something goes wrong, it’s usually best to start again from scratch (i.e. delete the value and recreate it) rather than hunting through the binary data to try and find the error.
It might just be me, but I think that from the off, that looks a far more slick, polished and professional introduction to your users.
So now all you’d need to do would be to seal the image and deploy it out to your PVS (or equivalent) environments.
Deploying the Legal Notice in a traditional environment using Environment Manager
Without something like PVS, you are going to have to think of another way to deploy this. Naturally the first thing a lot of people would consider would be something like a Registry export and import – create the settings on a test machine as above, and then export the Registry key to a .reg file, and import it in to your endpoints.
However, this doesn’t seem to work at all. If you set the values as above and then export them to a .reg file, when you import them back in, the LegalNoticeCaption appears without issue – but the important bit, LegalNoticeText, is blank. I don’t know the exact cause of this and would probably be interested in finding out, but it is probably something to do with the export format for a REG_SZ value and the binary format of the data we are trying to import.
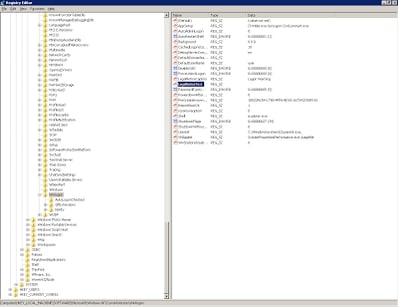 |
| The text value shows as completely blank after a .reg file is imported |
So, how can we get around this? The only reliable way I found to achieve this was to actually use a VBScript to deploy the values, which allowed us to insert legible carriage returns directly into the target Registry area. As mentioned earlier, you don’t specifically need AppSense Environment Manager to do this – a Group Policy Startup Script would suffice – but the AppSense Environment Manager option, as always, tends to give you a lot more flexibility and granularity with regard to the application of the setting.
We create a new Reusable Node for this Action. Unless you are planning on referencing it multiple times within the same configuration then a Reusable Node strictly isn’t necessary, but for portability it seemed like a logical thing to do. Inside the new Node we simply create a single Custom Action and populate it with this code (kindly adapted from an online example provided by Mike Stephens of Microsoft)
‘ AUTHOR: Mike Stephens , Microsoft Corporation
‘
‘ DATE: 26/11/2007
‘
‘ Sample VBScript to set LegalNotice values with carriage returns
‘ ==========================================================================
strLegalCaption = “Logon warning”
Const LEGAL_CAPTION_VALUENAME = “legalnoticecaption”
Const LEGAL_TEXT_VALUENAME = “legalnoticetext”strLegalText = “”strLegalText = strLegalText & “” & vbcrlf strLegalText = strLegalText & “This computer system is the property of Acme Corporation and is for authorised use by employees and designated contractors only.” & vbcrlf &vbcrlf strLegalText = strLegalText & “Users have no explicit or implicit expectation of privacy whilst utilising the applications, infrastructure and services provided by the company.” & vbcrlf & vbcrlf
strLegalText = strLegalText & “Any or all uses of this system and all files on this system may be intercepted, monitored, recorded, copied, audited, inspected, and disclosed to authorised site, company, and law enforcement personnel.” & vbcrlf & vbcrlf
strLegalText = strLegalText & “By logging on to this system, the user consents to such interception, monitoring, recording, copying, auditing, inspection, and disclosure at the discretion of authorised site or company personnel. Unauthorised or improper use of this system may result in administrative disciplinary action and/or criminal penalties.” & vbcrlf & vbcrlf
strLegalText = strLegalText & “By continuing to use this system you indicate your awareness of and consent to these terms and conditions of use.” & vbcrlf & vbcrlf
strLegalText = strLegalText & “It is the user’s responsibility to LOG OFF IMMEDIATELY if you do not agree to the conditions stated in this notice.” & vbcrlf & vbcrlf
‘ Edit the lines above as necessary
wShell.RegWrite POLICY_KEY & LEGAL_CAPTION_VALUENAME, strLegalCaption, “REG_SZ”
WShell.RegWrite POLICY_KEY & LEGAL_TEXT_VALUENAME, strLegalText, “REG_SZ”
Obviously, you will have to substitute your own text for the values for both strLegalText (on a per-paragraph basis) and strLegalCaption.
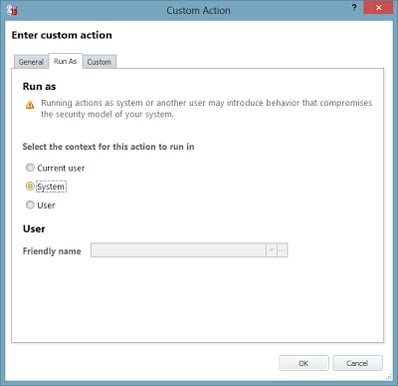
Now, once you’ve got this Custom Action saved set it to run as System as below
and then reference the Node from an appropriate area in the Computer Startup trigger.
Now, when we save the configuration, deploy it, and then restart our systems, we should see a nice professional-looking Legal Notice as shown below
Summary
I’m kind of hoping that this value is handled better in Server 2012 and Windows 8/8.1, as it has traditionally been a bit of a nightmare to get it deployed in a nicely-formatted way. Citrix admins in particular suffer a lot from bad perceptions of their infrastructure due to circumstances beyond their control – poor application performance and incompatibility being two of the most common – so a way to tidy up and polish the first screen the users see should go at least some way to improving the first impression they get!

