I wrote a post some time ago detailing how to save the Windows 10 Start Tile settings and roam them through AppSense Environment Manager. However, it wasn’t 100% reliable – intermittently, I would see what I’ve come to call the Windows 10 “dead man click”, when the Start Menu simply stops functioning because we’ve inadvertently corrupted the database that runs it. In fact, I’d hazard a guess that the database they use is composed of the electronic equivalent of crisps, because it’s very fragile and gloriously easy to break.
UPDATE 23/09/16 – with the release of Windows 10 1607, I’ve written an up-to-date article which shows how to deal with the Start Tiles more effectively. Please reference the new article here.
With this in mind, I’ve been trying to find a better way of achieving this for some time. However, I’m quite aware that Microsoft may well introduce a method of doing this natively at any given moment (although given some of their recent decisions, I wouldn’t be putting any money on it).
It was thinking back to how we managed to roam the Windows 8.1 Start Screen that gave me an idea. Windows 8.1, and Windows 10, have PowerShell cmdlets that allow you to export the Start Layout to a file. Couldn’t we do this with Windows 10 and the Start Tiles?
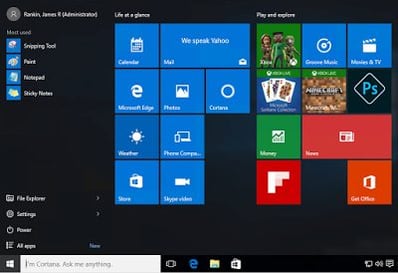
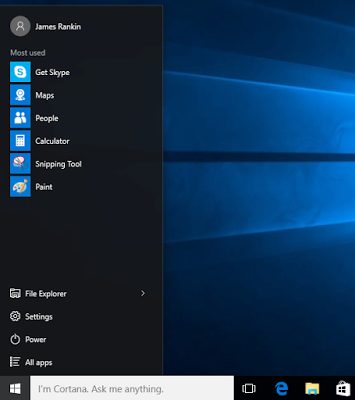
Firstly, let’s look at the Microsoft default Start Tile settings. We’ve done all of this testing on Windows 10 Enterprise Current Branch for Business, fully patched at time of writing.
It never fails to make me cringe every time I see this screen (and this one appears to have some of the worse cruft, like Candy f**king Crush Soda Saga, removed). It’s like a great big advertising hoarding has been splattered across what was previously a slick, unintrusive and reliable applications launcher.
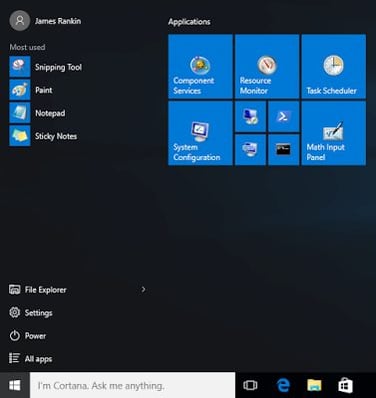
Let’s tidy it up a bit and get it the way we want it, as well as putting some custom names on the Start Tile groups.
That looks much better!
Now, Microsoft offer a couple of ways to set the Start Tiles to a specific layout. What you do is, use a PowerShell cmdlet to export the current settings out to an XML file, and then a Group Policy Object to import them back in. If we could run the export at logoff, we could then generate a user-specific file to import back in at logon, no?
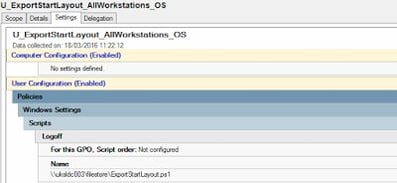
Unsurprisingly, I first tried to do the export command via AppSense Environment Manager. However, for some reason calling the Export-StartLayout cmdlet in the AppSense EM Logoff trigger doesn’t seem to work, and I haven’t yet had time to work out why this is the case. So to achieve this, we fell back on an old-fashioned Group Policy Logoff Script.
The command we need to run is this, so this will need to be put into a .ps1 file
Export-StartLayout -Path \\UKSLDC003\FileStore\HomeDrives\$env:USERNAME\StartTiles.xml
All we need to add is the -Path parameter, which we have pointed to the user’s homedrive location. It’s important to use a home drive or dedicated user-specific shared area, because each user will spit out their own export files.
It’s quite easy to then configure a logoff script and point it to the PowerShell script that we’ve saved
We’ve also configured a WMI filter for the GPO to ensure it only runs on Windows 10. The filter is shown below. WMI filters can make group policy processing less efficient, but in this case it makes sense as a) we are only running a single logoff script, and b) we don’t want it running on other operating systems.
Once the Group Policy is in place, we log off the user with the customized Start Tiles, and we can see an XML file with the right timestamps is written to our homedrive location.
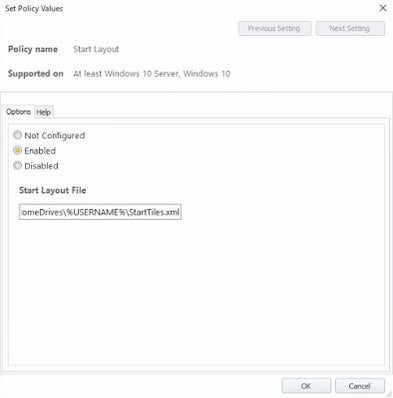
Now, we need to set the Group Policy which will import this file into our user’s profile next time he logs on, even if it is on to a different machine which he/she has no profile defined on. The GPO we are looking for is in User Configuration | Admin Templates | Start Menu and Taskbar. It’s only available on the Enterprise and Education editions of Windows 10 (rather annoyingly)
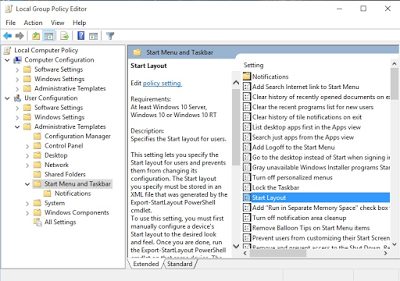
A cautionary note – make sure you set this Group Policy Object from a Windows 10 machine, whether you do it via AppSense or standard GPMC! Windows 2012 R2 has a GPO with the same name which is for Start Screen settings on Windows 8.1/2012 R2. If you configure this from a server you will very likely end up using the wrong GPO. You could import and use the templates on your server, but because they both have the same name it can get very confusing. Best practice is to install either the Group Policy Management console or AppSense Environment Manager console onto a Windows 10 workstation and configure them from there.
Now here’s where it starts getting murky.
One of the problems with using this GPO to do this is that it locks the Start Tiles. It’s right there in the description of the GPO – “users cannot customize their Start Screen layout while this policy is enabled”. Why this is the case is utterly unclear (divining Microsoft’s intentions these days is beyond me, and probably God as well).
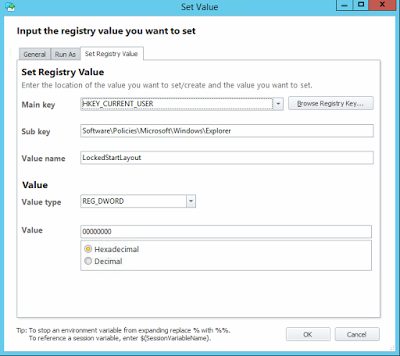
What the policy does is write a couple of Registry values to HKCU\Software\Policies\Microsoft\Windows\Explorer. The first one, StartLayoutFile, is an expandable string that points us to the required XML file. The second is a DWORD called LockedStartLayout, and this is set to 1. So surely we can just unset this to 0 and it will all be well and good?
Er, no.
There is some kind of symbiotic relationship between these two Registry values. Once the StartLayoutFile value is set, this is then applied somewhere later on in the logon process (probably at whatever point the Start Menu is created). However, if the LockedStartLayout value is not also set to 1, the StartLayoutFile value will be ignored when the Start Menu is created, and you’ll be stuck with either the godawful default, or whatever is in the user’s local profile (should there be one on that machine).
OK then, so maybe we just use AppSense Environment Manager to set the LockedStartLayout value to 0 after the Start Menu is created?
That does work in regards to setting the value, but the problem is, the Start Tiles are also locked at the same time the Start Menu is created. Even with LockedStartLayout now set to 0, the Start Tiles essentially need to be “refreshed” to allow the user to manipulate them.
Remember the “Tile Data Model Server” service? This is intrinsically linked to the Start Menu and the database. If you disable this service (not a trivial task – you need to go into the Registry and set the Startup type to 4), you will get an application crash or a blue screen of death every time you click on the Start Menu. So it’s clearly very involved in this new left-hand corner abomination that Microsoft have saddled us with.
If we set the GPO for the Start Layout early in the logon process, allow the logon to finish and create the Start Menu, then set LockedStartLayout to 0 before stopping the Tile Data Model Server (it automatically restarts as soon as it is stopped) – will this allow us to customize the Start Tiles and roam them from device to device and session to session?
This is quite a demanding bit of tooling so I’m using AppSense Environment Manager to do it. To achieve this without a UEM product would require somehow setting the LockedStartLayout value after logon (maybe a Scheduled Task running reg.exe?) and then stopping the service (which needs elevated privileges). I’m going to have a go at doing this without UEM tools over the next week or so, so expect an update to the article pretty soon.
For the moment, let’s just do it with AppSense Environment Manager.
The Desktop Created trigger runs too early (this is becoming a regular occurrence on Windows 8.1 and Windows 10), so we will need to instate a Post-Logon trigger to achieve this. In my testing I set the post-logon trigger to 3000ms, which seemed to work fine.
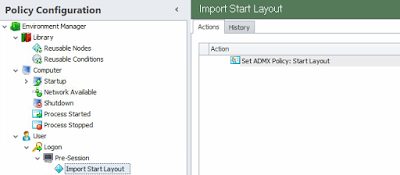
Once you’ve set up the Offload Trigger, you need to put the first part in, which is the GPO to set the Start Menu layout from the XML file in the user’s home drive. This needs doing nice and early so it’s an ideal use-case for the Pre-Session trigger. Set the path to the XML file you specified in the Logoff Script earlier.
Next, we need to put the Actions into the Post-Logon trigger, firstly, the one to set the value of LockedStartLayout
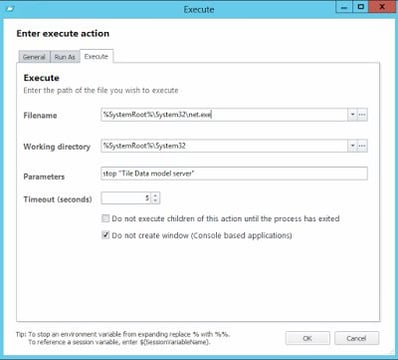
And after that, an Action to stop the Tile Data Model Server service
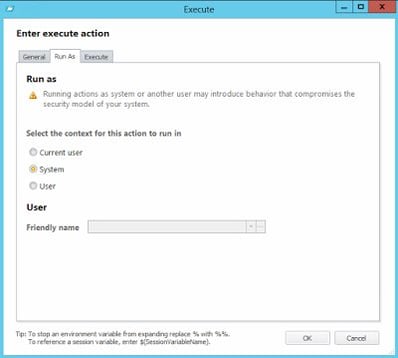
which naturally needs to run elevated
And obviously, you need to make sure that your Group Policy Logoff Script is correctly configured and pointing to the .ps1 file which will use the Export-StartLayout cmdlet.
So, does it work?
The resounding answer is YES. The Tiles roam flawlessly, whether the user has an existing local profile or no profile whatsoever. The only issue I have is that when the Tile Data Model Server service restarts a few seconds after logon has finished, if the user happens to be using the Start Menu at this precise point, the Start Menu will disappear. However, it is a very little potential niggle compared to having the rainbow-coloured vomit of the default Tiles appear every time you log in to a new device. I tested it on machines running different builds of Windows 10 (some without the 1511 update, some with, and some on the latest Insider preview build of 14279), and it still worked well. However, if you want it to move between Current Branch and Long-Term Servicing Branch this may have some issues. However, if you pin a Tile and that application is not available on the next device you log into, you will see a blank Tile rather than experience any errors or corruption, so it’s not a showstopper if you have devices with different application sets and/or servicing branches.
There were a couple of other oddities noticed. If you pin a Tile to the very bottom of the menu, on a machine with a different resolution this Tile may sometimes appear across to the right rather than at the bottom. And if you make your Start Menu completely blank (see image below), this may cause it to reset to the default next time you log on (although it sometimes works fine). Aside from these niggles, though, it’s a vast improvement on what we had (which was essentially nothing, or mess around with copying a database file around that was as easy to corrupt as a member of FIFA).
Of course, this is all done in a small lab without big layers of complexity on top. Test thoroughly before you deploy this. You may need to tweak the delay on the Post-Logon Trigger to get optimal results. Timing is everything in the Windows 10 logon process.
You could possibly save the XML file into Personalization Server, then unpack it to a local location early in the logon. This way you would get rollback, compression and integrated security around it. I will explore that in a later post, but for now I will concentrate on putting an update in that allows you to replicate this functionality using native Windows tools rather than a third-party UEM solution like AppSense or RES.
Anyway, here’s hoping this may help some out there. Look out for some updates to this article coming soon!
Update #1 (21/03/16) – a few people have emailed me asking about the Import-StartLayout cmdlet and whether this can be used instead of the GPO jiggery-pokery we use to import the layout. Unfortunately, this cmdlet is intended to only import layouts to an offline WIM image. You can use it on an online OS, but it will modify only the default profile, and not the user logging in. So unfortunately, a non-starter for allowing the settings to be imported at user logon time, which is a big disappointment as the Import-StartLayout cmdlet removes the need to unlock the tiles afterwards.

