We’re all familiar with the use of Windows PCs as internet browsing kiosks. I can recall building many a kiosk on Windows 7 using the imaginatively-titled Internet Explorer “kiosk mode”. There are a raft of third-party tools that were used to enable this functionality for those of who couldn’t be bothered to spend the time to lock them down. The idea is that users are given a throwaway, cut-down machine that provides nothing but basic access to a browser for idly leafing through the goodness of the modern web.
So I wasn’t particularly bothered when I came across the (first) instance I’d seen of someone wanting this on Windows 10 running Microsoft’s new browser, Edge, rather than the old warhorse Internet Explorer. After all, in the immortal words of Andy Wood and Jim Moyle “how hard can it be?”
Well. Hindsight is a beautiful thing, let me assure you.
But anyway – let’s start with a list of the requirements we had for our new shiny Windows 10 internet kiosk.
- It must run Microsoft Edge, not Internet Explorer
- The user should not have to remember or be given a password – logon should be automatic
- The user should be presented with nothing more than a full-screen browsing session upon logon, branded as necessary
- There should be no way for the user to activate other applications, browse the filesystem, or otherwise delve into or use other parts of the operating system
- Ideally, the user’s settings (such as websites visited, bookmarks, cookies, etc.) should be purged at the end of the browsing session
Doesn’t sound too bad, no? Especially as though I’d done this with Internet Explorer on Windows 7 many times. So, should be a nice short and succinct article…
Yeah, right.
Part #1 – Assigned Access and Custom UI
Now, anyone who has ever scanned through a list of Windows 10’s features (or attended one of my many sessions on the subject) is probably quite aware that the new Microsoft operating system ships with a feature called Assigned Access. And Assigned Access is – well, it’s a way to enable a kiosk mode that can only one run application! Sounds just what we need, eh?
One small problem though. Assigned Access only allows you to assign Universal Windows Platform apps (Modern Apps, if you prefer) for the kiosk mode. Well, Edge is a UWP app isn’t it? Actually it’s not quite a UWP app, it doesn’t update through the Windows Store, and it turns out it’s actually not available as an option in Assigned Access. And neither is any browser, for the record. So the built-in Windows 10 “kiosk mode” feature doesn’t actually allow you to run it with an internet browser of any sort. Now I’m not going to stand myself up as the world’s foremost “kiosk expert”, but in my experience, all of the ones I’ve built have been with “internet cafe”-style functionality in mind. I’ve yet to see a kiosk for running Remote Desktops, or the Microsoft Mail app. So these restrictions built into Assigned Access seem, well, not to mince words, absolutely and utterly ridiculous.
For browsers, the Assigned Access documentation recommends you use the old Microsoft method of a Group Policy Custom User Interface (User Configuration | Administrative Templates | System | Custom User Interface). You know, even on Windows 7, when building kiosks, I used to avoid this setting, but it’s not going to be an issue, because this isn’t going to fly with Microsoft Edge anyway. You see, even though Edge is a UWP app that isn’t really quite a UWP app (in that it won’t run via Assigned Access), it’s still enough of a UWP app to be unsuitable for Custom UI. Edge cannot be invoked by simply running the MicrosoftEdge.exe application – it either never appears, or throws an error. So if you set up the Custom UI GPO and point it at Edge – you’re no further forward.
At this point, I should have seen the warning signs and quit. But nobody ever accused me of being sensible.
Part #2 – shortcuts
Now, if you create a shortcut to Edge by pointing to the executable in %WINDIR%\SystemApps\Microsoft.MicrosoftEdge_8wekyb3d8bbwe called MicrosoftEdge.exe, it just doesn’t work. It either crashes or simply doesn’t respond.
However, if you drag the Microsoft Edge shortcut from the Start Menu to the Desktop, then you do get a working shortcut. There are some differences between the shortcuts (see the image below), but I’m not entirely clear how to interpret them. Certainly, the left-hand one fails, the right-hand one works.
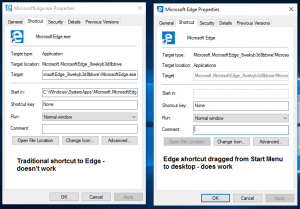
OK, that’s by the by – so can we perhaps copy the working shortcut into a file share, and then insert it maybe into the user’s Startup folder when they log in and get Edge to run that way?
Sounds good…but then so did David Moyes at one stage. For some reason, what is a working shortcut on a user desktop becomes useless when transported into the Startup folder. Scratch that idea as well!
Part #3 – Running Edge from the shell
OK, so I can’t trigger Edge through Assigned Access or the old GPO method or by using a working shortcut in Startup. Any other ideas as to how I can make it run when my user logs in?
What you can do with UWP apps is call them from within the Windows shell by an unfamiliar method. You simply call the UWP app name and stick a colon on the end. Here are some examples, courtesy of Rod Trent
- Action Center – ms-actioncenter:
- Clock – ms-clock:
- Mail – mailto:
- OneNote – onenote:
- Edge – microsoft-edge:
Give them a try – Start | Run | command. They do work! So that’s at least something to concentrate on, eh? Maybe we can combine this way of invoking Modern Apps with the Custom User Interface GPO and give ourselves a way to make Edge run at logon…
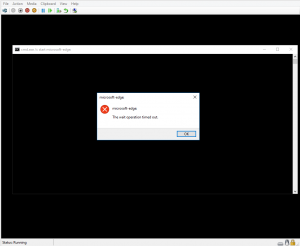
…well, I take it that’s a no then. Looks like invoking Edge as a “shell” isn’t really suitable either (update – Remko Weijnen informs me this is because UWP apps, such as they are, need Explorer present to run). Poor old Internet Explorer could live without it easily enough. OK, what’s next?
You can also invoke Edge from the command prompt or PowerShell, but as you can see from the image above (when we moved from “microsoft-edge:” to “cmd.exe /c start microsoft-edge:“), it needs to be done after the user has already logged in (as above update, because it needs Explorer). Now, Group Policy now has a default logon script delay on Server 2012 R2 and up (set out of the box to five minutes!!!), which we could use to run a command after the logon has finished and the shell started – but the value can only be set in minutes. Which means if we tried to do it through Group Policy as a delayed logon script, the user would have to wait a minute after logging in to the kiosk to get their browser window. Not a real starter.
Next thought that occurred was a Scheduled Task, but that’s just getting even more murky. You can’t set a Scheduled Task to run after logon specifically, although you could maybe use an event as a trigger – but I’m really starting to delve into the depths here. What I needed, at this point, was some more tooling – some help.
Part #4 – enter AppSense Ivanti DesktopNow
I really must get used to referring to AppSense as Ivanti. It just doesn’t seem to roll off the tongue so easily, although that may have something to do with spending nearly five years of your life writing the word “AppSense” multiple times into two hundred or so blog articles. I’m digressing here.
This was intended to be something anyone could set up, but Edge’s behaviour has sent me straight back to my old pal AppSense Ivanti DesktopNow for some extra help, which means this is now becoming a little bit specialized in terms of tooling. But that’s part and parcel of the challenge – you need to pick the right tools for the job. I’m sure RES or some of the other higher-end products in the endpoint management market could also manage this requirement – I just use DesktopNow because it’s my personal preference.
I’ve written on several occasions – here and here at least – about how you can use DesktopNow to set up a “delayed” trigger that runs a specified time after the user’s logon completes. We won’t go into this functionality in this article – it’s documented in the links and we will make a configuration available that contains the Actions for reference purposes at the end. In this case, I’ve set the delay after logon to 0.5 seconds because I want the commands to be processed as soon after logon finishes as possible. So after logon finishes, we call this command from PowerShell:-
start microsoft-edge:
and hey presto! We have Edge launching automatically for our user. Wasn’t that a hell of a lot harder than launching any other Windows process you’ve ever wanted to do automatically? Anyway – now we can crack on with the rest of our requirements.
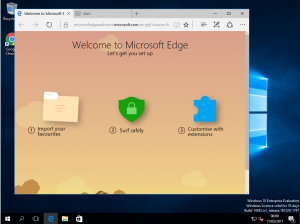
Part #5a – maximizing a window
I’ve already had my fingers burned with a reference to “how hard can it be?” so I’m not repeating it, even though all I want to do is run the Edge window maximized when it starts. It’s easy enough for Internet Explorer – so why am I so apprehensive?
Well probably something to do with the fact that we’ve already established we can’t use a traditional shortcut for this in any way shape or form, so running a shortcut with the “Run maximized” flag is out for starters. Maybe if we just open Edge, maximize it, and then find out where it writes the Registry keys that control the window size, that will do the trick…
This doesn’t look too bad, actually. Process Monitor reveals that on close Edge writes to two DWORD values in HKCU\Software\Classes\Local Settings\Software\Microsoft\Windows\CurrentVersion\AppContainer\Storage\microsoft.microsoftedge_8wekyb3d8bbwe\MicrosoftEdge\Main called LastClosedHeight and LastClosedWidth
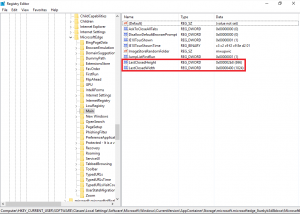
But imagine my surprise at another false dawn. No matter what these values are set to, or when it is done, Edge always opens in the same size window if the user hasn’t run it previously. We want it to always run maximized, so no good.
Cue more digging. So then I discover another Registry value (a BINARY one), this time at HKCU\SOFTWARE\Microsoft\Windows\CurrentVersion\ApplicationFrame\Positions\Microsoft.MicrosoftEdge_8wekyb3d8bbwe!MicrosoftEdge and going by the name of PositionObject, that seems to control Edge’s window position.
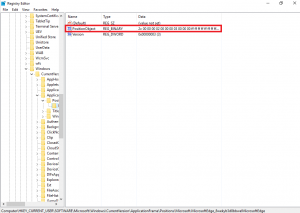
Now this one does actually do the trick if you maximize the window and grab the settings from the value before reimporting them – but only for specific resolutions. Try and port it to a larger or smaller screen resolution, and you’re straight back to the default size. FFS.
Another method that came to mind was forcing Windows 10 into tablet mode -which incidentally does actually make Edge launch maximized. But the UX is awful (Start Menu overlaid on the screen), so that’s out as well.
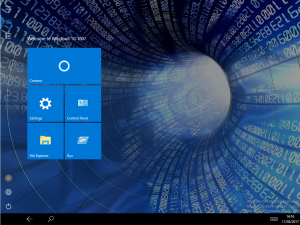
OK. It’s clear that tried-and-tested methods are no use here. What if we try something a little more radical? We know that you can maximize a window by clicking certain buttons in the Windows interface, but automating that is very hard. However, you can also maximize a window using keystrokes – and, last I heard, you could send keystrokes using PowerShell. Is this a potential way of getting around this requirement?
Part #5b – sending key presses
We’ve really come down a rabbit hole for this, and I’m not sure how much further it has to go. Maybe this should have been a series like the Windows 10 one (which still isn’t finished, as far as I’m concerned, but I’m off on a tangent again). Focus.
PowerShell and keystrokes, that’s where we’re at. Can you send keystrokes to a particular area of the session?
Indeed you can. Here is the code we will be using. To maximize a focused window, we normally use the key sequence “Alt + <SPACE>” and then “x” to activate the Maximize command (give it a try yourself).
# PowerShell to launch Edge maximized – starting the page and then using PS to send “Alt + Space and x” to the Edge window to maximize it
# This launches Edge with a specific page destination (Google in this case)
start microsoft-edge:http://google.co.uk
$wshell = New-Object -ComObject wscript.shell;
# This next line uses the window title to send the keystrokes to, so it’s essential the string matches the title of whatever page you are opening in Edge
$wshell.AppActivate(‘Google’)
# First pause is one second
start-sleep 1
$wshell.SendKeys(‘(%(” “))’)
# Next one is three seconds – test your own delays to get it working optimally and change as required
start-sleep 3
$wshell.SendKeys(‘(x)’)
The key parts are the window title, and the sleep commands. The keystrokes can only be sent to an active window (or a process ID), so it is essential we get the window title consistent so that we can send the key presses to the Edge process. This is why we are using start microsoft-edge:http://www.google.co.uk to launch Edge, as this ensures that the window title is ‘Google’ and can be picked out as such for the keystrokes.
The pause between the keystrokes is a bit of trial and error to ensure that the key presses are sent in the right order. In my environment, one second after the initial window activation and then three seconds after the “Alt + <SPACE>” seems to work most of the time, but you may need to give this a test to make sure it works in the same way for yourselves.
We can apply this using DesktopNow – in fact, we can do it just after we have started the Edge process through PowerShell. So Edge launches in its typical windowed mode, and then the keystrokes are sent which make the process run maximized. Cool! Not the most elegant way of doing things, but it seems to work, and that’s all we want. In hindsight, it’s not a huge issue if it maybe fails one time every ten or so – it just looks neater when the window is maximized. But I wasn’t stopping until I found a solution, no siree.
Part #6 – branding fun
It’s nice to make your internet kiosk look smart and presentable, which could easily be achieved by picking a suitable desktop background and copying it down onto the endpoint, then forcing it as the wallpaper through Group Policy. But because we’ve started out on this wonderful adventure of discovery, why not take it a notch further? So for this part, we are going to introduce you to an awesome trick that allows you to create specific images “on-the-fly” through your AppSense EM configurations. No more relying on files in file shares and/or copying them down to your endpoints based on Conditions – just create them with an Action.
We’re going to do this from a perspective of dropping an image to be used as the desktop background, but you could extend this to any file you need to leverage into the AppSense Ivanti DesktopNow configuration from outside of it. Essentially you could make the whole thing self-contained for distribution into different environments.
Mr Guy Leech deserves credit for this, and it is documented thoroughly on his blog over here. Basically, in this example, first you pick an image that you want to use as your desktop background. Then run some lines of PowerShell to encode the file into base64 in a text file (change the paths as required below)
$inputFile = ‘c:\users\jrankin\downloads\InternetKiosk.jpg’
[byte[]]$contents = Get-Content $inputFile -Encoding Byte
[System.Convert]::ToBase64String($contents) | Set-Content –Path c:\users\jrankin\downloads\encoded.txt
Don’t pick a file that’s too big – I started on an 11MB image file and it nearly crashed my machine. In this case the file was 800KB and ran through quite passably.
Next, you need to copy the entire contents of the output file (in this case, encoded.txt) and paste it into the PowerShell command that we are going to call at Computer Startup (because this seems the ideal time to create files that will be used in the user session for this example). Don’t worry about the huge amount of text you’re copying from the output file into the PowerShell command – it will fit! Here’s an example below – replace
$encoded = ‘Paste the humungous amount of encoded data in here’
$newfile = ( $env:WINDIR + ‘\InternetKiosk.jpg’ )
[System.Convert]::FromBase64String($encoded) | Set-Content -Path $newfile -Encoding Byte
Now, when this trigger runs, the PowerShell will create the file with the image in it from nothing more than the base64 encoding that we have embedded into the command line. Awesomely cool! I’ve made a configuration available at the end, and should you use this in test, you should find that you will get the same image set for the background as I used in my testing – without ever having to locate or download it. The image is created on-the-fly, and then a Group Policy Action sets it as the default desktop background.
I’ve made this Action Conditional on the fact that the file doesn’t already exist, as it is (not surprisingly) quite an intense command. It’s a super-cool trick and is very handy for making configurations completely modular and portable. Kudos to Guy – nice one.
Part #7 – automatic logon
A key part of any successful kiosk implementation is putting together an automatic logon. You don’t want to have to stick a password to the monitor or tell users what the password is – it’s much easier just to let it log on automatically.
The Registry values for automatic logon have existed since the Windows NT days and haven’t changed yet. They are as follows:-
- HKLM\Software\Microsoft\Windows NT\CurrentVersion\Winlogon\AutoAdminLogon
- HKLM\Software\Microsoft\Windows NT\CurrentVersion\Winlogon\DefaultDomain
- HKLM\Software\Microsoft\Windows NT\CurrentVersion\Winlogon\DefaultUserName
- HKLM\Software\Microsoft\Windows NT\CurrentVersion\Winlogon\DefaultPassword
They are all REG_SZ values. The first needs to be set to “1” to activate it, and the rest should be self-explanatory – populate them with domain name (not FQDN), username and password as required. Obviously as the password is going to be stored in clear text in the system Registry, it pays to make sure this user account does not have any privileges beyond that required to log on to the kiosk. Generally, I restrict the logon access rights for this account to kiosk machines only.
Interestingly, until you disable the Lock Screen on Windows 10 (via GPO), the automatic logon doesn’t work. So you will need this disabled in your Group Policy settings (if you use the configuration supplied at the end of the article, this policy will already be set for you). In addition to this, if you’re using Hyper-V, an Enhanced console session won’t run the automatic logon (because that is essentially an RDP logon, under the hood – you need to use a Basic session).
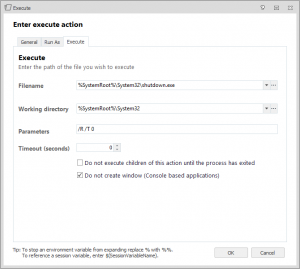
Finally, also a Windows 10 thing, when you log the user out, the automatic logon doesn’t work. It only seems to activate after a boot. That’s really annoying, but we’ve got around it by setting the kiosk machine to restart whenever the browser is closed, rather than logging the user out. This is done by using a Process Stopped trigger for MicrosoftEdge.exe in DesktopNow, which then calls a shutdown /r /t 0 command.
Part #8a – lockdown (Start Menu)
Now let’s get into locking down our Edge kiosk so that users can’t break out into the filesystem, other applications or the Windows user interface. The first thing we want to nail down is the Start Menu.
In Windows 7, we could hobble the functionality of the Start Menu via Group Policy Objects and then redirect the user to a custom (blank) Start Menu, which meant all they got were a blank Programs menu and a Log Off command. In Windows 10, though, we have these pesky UWP apps on the Start Menu which aren’t controlled by the filesystem entries we traditionally associate with the Start Menu, and the WinX menu as well (the “right-click” menu under the Start button). How do we deal with this?
You could remove all of the UWP apps from the image at build time, but this means that if you aren’t doing this en masse then you’re already getting into the realms of making your kiosk a separate image from the rest of the desktop estate. But seeing as though we’re already leaning on AppSense Ivanti DesktopNow to help us launch Edge, why can’t we use the tooling further to help us here? Bring out DesktopNow’s mighty Lockdown Tool…
If you’re not familiar with the Lockdown tool with DesktopNow’s Environment Manager product, here’s a quick rundown of how to use it. The process hasn’t changed much since that article was penned, so it’s all still perfectly relevant.
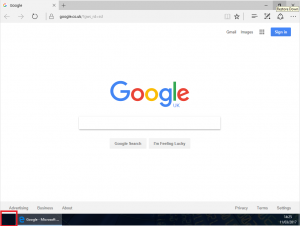
Fantastically, this works flawlessly when unleashed on the Windows 10 Start Menu, and also kills off the right-click access to the WinX menu as well (see the red section highlighted in the image below). Go AppSense Ivanti!
Part #8b – lockdown (all the rest)
So to lock down the rest of the shell, and Edge itself, we’ve (not surprisingly) put together a whole host of Group Policy Objects and Registry items that turn our Windows 10 machine into a nailed-down sandbox that only runs a browser.
The configuration we’ve made available at the end has all of these built in. We are applying the user settings only if the user name matches the one we’ve set up (in this example it was JRR\kioskuser, who is our auto-logon user account), and the machine settings only if the computer name matches our kiosk naming format (anything matching KIOSK*, in this case). I don’t understand why some Edge settings and some shell settings are only available as Computer Configuration items (e.g. prevent OneDrive from being used, turn off web search, etc.) Both of the “driver” Conditions are inserted as Reusable Conditions so if you want to change them to your own environment, you just need do it in one place.
I’ve also (in the Edge Process Started node) applied some Lockdown items which get rid of the Share, Web Note and More options in Edge which only provide entry points into UWP apps like OneNote and the like. If you want stuff like Web Note to work, then remove the Lockdown item pertaining to it. There’s also some stuff to clear Edge data at application close – but I’m not sure if that works as intended. More on that in the next section.

This set of policies is all contained within the AppSense Ivanti DesktopNow Environment Manager configuration (including the background, as from the cool PowerShell above), so you should be able to drop it onto a Windows 10 1607 build with the default set of ADMX files and it should work out of the box. As far as I can tell 🙂
Part #9 – purge the user’s browsing data
Maybe it’s just me but I wouldn’t like to open the address bar and be confronted by a previous user’s web history (especially if they read The Guardian). And there’s also the problem that if a user accidentally saves passwords or other security information into the browser, we don’t want it to persist into the next session. So how can we deal with this?
It (again!) sounds fairly simple, but the key problem we have here is that as soon as Edge closes, we’re initiating a reboot because otherwise the autologon doesn’t work. So if we try to purge the user’s profile at logoff (by marking it as temporary, or dropping the user in the Guests group), it won’t necessarily finish deleting before the system restarts. And because it logs straight on using the same user account, we can’t purge it at boot time, either. We really need to find another way rather than dropping the whole profile, as not only does this not work, but it also means the next logon takes exponentially longer.
Fortunately yes, and this seems to work first time (OMG!) Simply set the “clear browser history at logoff” within Edge, and then capture and import these Registry values at next logon, to ensure that all evidence of previous misdemeanours is nicely swept away when the application closes.
Key – HKEY_CURRENT_USER\SOFTWARE\Classes\Local Settings\Software\Microsoft\Windows\CurrentVersion\
AppContainer\Storage\microsoft.microsoftedge_8wekyb3d8bbwe\
MicrosoftEdge\PrivacyValue – ClearBrowsingHistoryOnExit DWORD 1Value – CleanDownloadHistory DWORD 1Value – CleanForms DWORD 1Value – CleanPassword DWORD 1Value – InProgressFlags DWORD 0Value – ClearBrowsingHistoryOnStart DWORD 0
[Note to ensure that this text fits neatly into the window, we added a couple of carriage returns in the key - check that they are removed before using this code]
Not sure why the “ClearBrowsingHistoryOnStart” needs to be set, but when the option is changed both the Start and Exit values are toggled, so it needs to be set in order for this to work effectively.
Final stage – the $64,000 question
That was an awfully long and quite frankly painful investigation into the feasibility of an Edge-based internet kiosk. So if I spin up a new Windows 10 1607 instance, patch it, install the AppSense Ivanti DesktopNow agents, and then apply the configuration we’ve created, will it actually work?
As this is quite a complicated thing to demonstrate working, we’ve recorded a video of it which is embedded below. Of course, if you don’t have the time to listen to my Alan Partridge-esque commentary as I run through an example of this in action, then just skip ahead…
Of course it works. Well, most of it. The keystroke delays to maximize the window are the one bit where I see intermittent issues. Occasionally the “x” keystroke I’m sending gets lost and hops over to the search bar, so if you see an autocomplete suggestion for Xabi Alonso or The X Factor, then that’s what has happened. You can get around this by messing with the delays in the PowerShell that sends the keystrokes, which appear to be dependent on how many other actions are running in there too. Weird, but it’s not a total showstopper, and if you’ve watched the video, most of the time it works absolutely fine.
So yes, in summary, it is possible to set up a Microsoft Edge-based kiosk. But it’s very hard compared to running Internet Explorer in kiosk mode, and without AppSense Ivanti DesktopNow or another high-end endpoint management tool you’d be struggling, to be honest. Even if you lifted the policies to an IE-based kiosk, you’d still have the Start Menu as a big fat entry point for the user to all their other apps. And even though in my Windows 10 deployments it appeared trivially easy to break the Start Menu, when I wanted to do it deliberately, as in this case, I just couldn’t manage it. C’est la vie!
If you want an Edge-based kiosk (or any locked-down kiosk on Windows 10 that doesn’t use third-party kiosk tools), then this is the way to do it. It’s not straightforward, it needs powerful tooling, you’re going to do some scripting, and to top it all off the browser itself ain’t that great anyway (I’m not going to go into how to enable Google as a search provider in Edge – that’s another article for the future). But it can be done. Yes it can. The video proves it, and I’ve shared the configuration that we used (including Guy’s awesome PowerShell to build files on-the-fly) to help you get started easily should you wish to create something like this.
And now to try and get back the four days of my life I’ve spent doing this. Stubbornness is a terrible thing.


