Deciding on your profile type is an important part of any virtualized deployment, but it is particularly important when deploying AppSense DesktopNow, as AppSense merges user settings into a base profile to create the user environment. The idea is that the local copy of the profile is discarded at logoff – meaning that normally, the options for working with Personalization Server are a mandatory profile, or using a local profile with the “flip to temp” trick (which is made infinitely easier in EM 8 FR5 with the new session variables).
About mandatory profiles
Mandatory profiles have certain restrictions that may or may not hold you back – sometimes specific types of certificates don’t work particularly well with them, although there are ways around this (spoofing using the Advanced EM Setting SpoofProfileForWholeSession, for instance). It depends on the applications in use in your environment, really, as to whether local flip-to-temp profiles or mandatory profiles should be used. Some people use a rule of thumb as “mandatory for XenApp, local for VDI”, but there is no real right or wrong answer.
I prefer to use mandatory profiles where possible because it’s easier (in my opinion) to create a mandatory profile with certain default settings than it is to customize the “Default User” area of your base image and push this out. If you’ve already got an established estate, then using a mandatory profile may be much easier. But as I said, it depends on how your applications behave, so good testing is, as usual, very necessary.
Citrix UPM uses a unique approach whereby a “template profile” can be defined rather than a “mandatory” one, but adding UPM to the mix just to take advantage of this feature would probably be overkill. It’s also worth mentioning that there are now two flavours of mandatory profile – standard mandatory, and “super-mandatory“. Super-mandatory profiles work in exactly the same way except users are denied logon if the profile is unavailable (it’s essentially the same as configuring a mandatory profile and setting the “Log users off if roaming profile is unavailable” GPO). This is handy for ensuring users can’t sidestep any restrictions built into the profile by logging on with a temporary profile.
Storing mandatory profiles
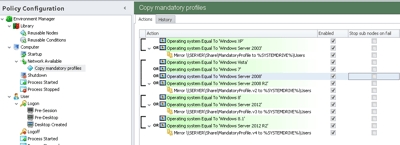
As to where to store the mandatory profile, again this is up to you, but I prefer to keep it local to the system, usually in C:\Users\MandatoryProfile or similar. You can store it on a network share for easy updates, but if the share goes offline you will lose access. An ideal way to get the best of both worlds is to put it on a network share and use an AppSense EM Mirror Folder Action to copy the files to the device at Startup (in EM 8 FR5, Mirror now hides under the Copy Folder Action).
OS Profile types
XP and 2003 used “v1” profiles, whereas 7 and 2008/2008 R2 use “v2” profiles. Later OSes will use .v2 by default, but they will “convert” them first, leading to a drag in logon time. In the interests of keeping logon time down, it is probably best practice to create a mandatory profile for each version you’re going to be deploying – this may take a little longer to set up, but you will reap the benefits later.
With a nod to Richard Thompson here, who covered this off in a recent blog post, first you would need to install the following Microsoft hotfix (on the Windows 8/2012 or later machines) to enable specific profile types for each operating system type – https://support2.microsoft.com/kb/2887239
This will mean that each OS version now expects a specific profile type:-
- Server 2003/Windows XP – v1 profile
- Server 2008/Server 2008 R2/Vista/Windows 7 – v2 profile
- Server 2012/Windows 8 – v3 profile
- Server 2012 R2/Windows 8.1 – v4 profile
- Windows 10 RTM and 1511 builds – v5 profile
- Windows 10 1607 build/Server 2016 – v6 profile
So what you’d need to do is create a profile for each under your mandatory profile store, we will use \\Server\Share for the example here
- \\Server\Share\MandatoryProfile (for XP and 2003)
- \\Server\Share\MandatoryProfile.v2 (for 2008, 2008 R2, Vista and 7)
- \\Server\Share\MandatoryProfile.v3 (for 2012 and 8)
- \\Server\Share\MandatoryProfile.v4 (for 2012 R2 and 8.1)
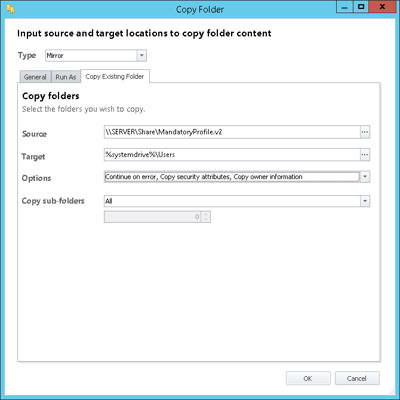
Then it would be a good time to get creative with our AppSense Mirror command, assuming you’re going to follow my lead and copy them to the device at startup (this would be an ideal time to make use of 8.5’s Network Available trigger!)
Don’t forget to use the flags on the Action to Copy Security Attributes and also the Ownership attributes (see below)
Deployment of mandatory profiles
Mandatory profiles can be defined on the user object in AD (on the Profile tab, RDS Profile tab or both of them, as required) or pushed via a Group Policy Object (for RDS only). Bear in mind, though, that if you define the GPO it is a Computer setting, and will apply to all users logging on to the machine (including Administrators), so if you’ve over-restricted the base profile, test your admin access. I’ve also seen people deploy mandatory profiles in a more targeted fashion using scripts to modify the profile settings.
It’s also worth mentioning that the path to a mandatory profile is independent of the actual folder path. For instance, if we defined the path in AD or via GPO as “C:\Users\MandatoryProfile”, this would actually work for all the profiles described above. This is because dependent on the operating system that the user logs on to, the “.vx” extension will be automatically added as required. So if a user had a mandatory profile path defined as “C:\Users\MandatoryProfile”, and they logged on to a Windows 7 machine, the operating system would actually look for the profile in “C:\Users\MandatoryProfile.v2” rather than the specific path. This is very handy and means we can define a single mandatory profile path yet have multiple, OS-dependent profiles available.
Creating a mandatory profile
I’ve attacked this in a rather backward fashion – discussing the deployment of the profile first and the creation second. However I think it is important to first understand how the profiles work before setting about creating one, so if this post appears a bit back-to-front, my apologies.
When creating one, don’t forget to repeat the process for each of the profile types you require, as shown above.
1. Create the base profile
This is probably the easiest bit – log on to an endpoint of the type you require (for instance, if you were creating a .v1 profile for XP or 2003, either an XP or 2003 endpoint would suffice, you don’t need to log on to both) and set the environment as you want it to be. Make sure the user you’re using is not an admin, obviously, and then set the desktop up as you want it. You don’t need to get gung-ho here – for instance, things like Control Panel items will be controlled through GPOs/EM – just get the look and feel the way you want it. Maybe you want to pin some default items to the Taskbar, change the folder views, lock the Taskbar, mainly cosmetic stuff.
Make sure the user and device don’t have any Group Policy Objects or other environmental setup actions (like logon scripts) applying to them, at this stage (Block Inheritance is your friend here). And obviously make sure the user has a local profile, not a roaming one!
2. Log out and back in, and then out again
At this point I like to log the user out, log them back in, and then out again. This just makes sure all the settings are saved correctly into the profile.
XP and 2003 still have a Copy command under User Profiles, but it has been removed in later versions of Windows. Never fear – you can simply copy the entire %SYSTEMDRIVE%\Users\username folder across to your network location.
The beauty of the Copy command was that it would automatically set the Registry and filesystem permissions for you, reducing the amount of effort required to get the mandatory profile up and running. So we will have to do this manually in steps #4 and #7. As to why Microsoft removed it – I can only guess they were trying to force people to use automated Windows utilities to produce the modified profile instead. I’ve heard some rumour that they don’t support profiles created without automated MS tools – but I’ve never had anyone from Microsoft complain about supporting an environment with profiles created in the way described in this post.
4. Change the Registry permissions
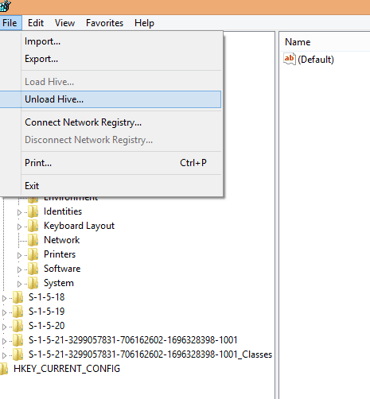
Next you need to make sure the Registry permissions are correct so that all users can read it. Open regedit.exe, click on the HKEY_USERS hive on the left, and select File | Load Hive. Browse to the network share where you copied the files to and select the ntuser.dat file (you may need to select the Show Hidden Files option in Explorer). The ntuser.dat file holds all of the user profile’s Registry keys.
The dialog will ask for a name for the key, type anything you want in here. Next expand the HKEY_USERS hive and right-click on the hive you’ve just loaded (this is where the name comes in handy!) Choose the Permissions option.
Remove the original user from the ACL, and then give the Everyone or Authenticated Users group Modify or Full Control (if you’re worried this affects security, you can put NTFS Read permissions on the .dat file itself, but I don’t normally consider it an issue). Use the Advanced button to replace the permissions on all child folders with the ones you’ve defined. You sometimes get an error at this stage about setting subkey permissions – this doesn’t seem to affect anything.
5. Flag and sanitize the Registry
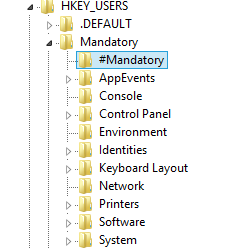
At this point, I generally insert a key or value into the Registry hive so I can tell that it’s a mandatory profile, just for troubleshooting purposes (see screenshot). Up to you whether you do this, I find it handy though.
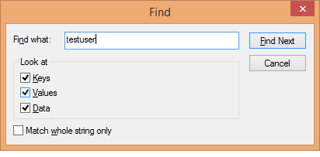
Now, the Registry will contain lots of references to the user which was used to create the profile – now is the time to dig them out. I generally do a search for the username and also for the user SID (use psgetsid to find it if necessary) and remove all references. Take particular care with the User Shell Folders key, however – rather than remove references to the user (if present) I generally replace them with %userprofile% entries.
Another thing to remove at this stage would be any Policies keys – generally found in HKCU\Software and also in HKCU\Software\Microsoft\Windows\CurrentVersion.
You can also remove any items from the Registry you think shouldn’t be there (you will be amazed at the references you find). HKCU\Software\AppDataLow is generally useless, as are references to the likes of Adobe and Google. Be careful, though, that you don’t break something by being over-exuberant (although I’ve been pretty brutal in the past, to be fair, and I’ve yet to cause an issue).
Once you’ve done all of this, don’t forget to unload the profile by clicking File | Unload Hive with the top-level key selected, otherwise you will lock the profile and no-one will be able to access it. This has happened to me in the past, so be warned, it’s easy to do!
I have seen people try to save logon time by inserting various Group Policy Registry values into the mandatory profile. You can adopt this approach if you want, but the logon time you would save (probably milliseconds) has to be balanced against the fact that you’d have to more or less repeat this process if you wanted to edit or remove the settings you put in at this stage. With that in mind, I wouldn’t recommend it.
6. Delete LOG and BLF files
Once you’ve edited the Registry, look in the share where you’ve stored the profile and you may find a bunch of files with .LOG and .BLF extensions have appeared. Remove these – they don’t appear to have any relevance (I’d be interested to find out why they sometimes appear, however).
7. Change the filesystem permissions and ownership
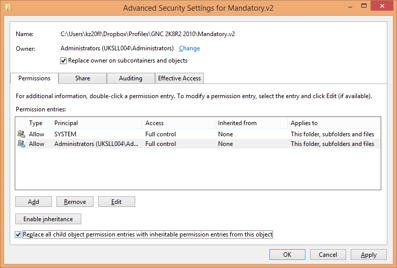
You will find that the files in the profile folder also need to have permissions set correctly. Again, change them to an appropriate ACL and remove the original user (if present), then propagate them down the folder structure. You will also need to check that the share permissions are OK.
It is also very important to make sure that the BUILTIN\Administrators group is the owner of the folders and files in the profile, otherwise the profile load will fail. Set the Owner from the Advanced tab and propagate it to all child items.
Finally, make sure that the Authenticated Users group has only Read permissions to the file share where the profile is stored (perform this step once you’ve finished all the other steps below, otherwise obviously you won’t be able to edit anything). Otherwise, you will end up with odd behaviour like the creating user’s username getting added to the Windows 8 Start Screen, and other weird occurrences. If you need to make a change to the files and folders in here, add Administrators back in, make the change, then remove the permission for admins again.
If you’re using the Mirror Action we showed above to copy this to endpoints, the security permissions and ownership should be preserved correctly. If you’re not using EM, make sure that the parent folder for the profile has the correct permissions and ownership, and inheritance is turned on.
8. Sanitize the filesystem
The files and folders in the profile we’ve created are mostly extraneous. You can delete the Local and LocalLow folders in the root of AppData straight away. Anything else in there needs to be verified, but I normally get quite aggressive and delete most everything apart from a few things in the AppData\Roaming folder (mainly Pinned Items, Taskbar Items and Start Screen files). I’d recommend being quite aggressive too – but keep a backup copy in case anything behaves oddly.
It’s up to you whether you maintain the user shell folders in here like Documents, Desktop, Downloads, etc. If you’re using Folder Redirection these should be recreated anyway, but I leave them in as empty folders usually.
9. Rename the .dat file
Once you’ve done all of this, rename your ntuser.dat file to ntuser.man to make it mandatory (if you’re going super-mandatory, the folder name also needs changing).
This would be a good time to check the size of your mandatory profile. A decent size is usually about 1MB all in, although the Windows 8 profiles seem to be slightly larger. Under 2MB would be a good ballpark figure to aim for, at time of writing.
10. Deploy!
The final step is to populate the user field in ADUC or (if it’s RDS), the GPO for mandatory profiles (found in Computer Config | Policies | Admin Templates | Windows Components | Remote Desktop Services | Remote Desktop Session Host | Profiles | Use mandatory profiles on the RD Session Host server).
Now log in as a (different) test user and see if you get the mandatory profile loaded (you can check the profile type from the sysdm.cpl applet, or look for the custom Registry key we inserted earlier). If you’ve done everything right, hopefully it should be there.
It may seem like a big effort to set up these profiles, but if you get it done right, they probably won’t need touching again. In the long run, it’s probably worth it 🙂

